Dariusz on Software

Methods and Tools

About This Site

Software development stuff

Archive

Entries from January 2016.

Sat, 23 Jan 2016 20:40:05 +0000

hudson-bustContinuous Integration is a great thing. Allows you to monitor your project state on a commit-by-commit basis. Every build failure is monitored easily.

If you connect your unit and integration tests properly also tell your runtime properties of the project, for example:

  • Does it boot properly?
  • Doesn't it crash in 1st 5 minutes?
  • Are all unit tests 100% green?
  • Are all static tests (think: FindBugs, lclint, pylint, ...) free of selected defect types?

The implementation:

  • you encourage your team to push changes frequently to main development branch (having high quality unit testing suite you can even skip topic branches policy)
  • you setup some kind of Continuous Integration tool to scan all the repositories and detect new changes automatically
  • for each such change new build is started and tests are carries out automatically
  • all the build artefacts (including tests outcomes) are collected
  • the teams are notified by e-mail about build/test failures in order to allow them to carry out fixes quickly

OK, so we have outlined the plan above. Let's dig into details for every step. I'll use the most popular tool used named Hudson/Jenkins as implementation tool (there are two projects, but they're, actually, the same tool).

I'm going to address all the features I expect from continuous integration system (based on my current experience with other CI systems).

The installation

Hudson can be downloaded from http://hudson-ci.org/ site as single war file. The installation is trivial as you could run it by JRE-7 compatible java:

java -jar hudson-3.3.2.war

Then you open your Hudson console in your browser by: http://SERVER_IP:8080 and that's it! It's installed and ready for the job!

Basic build job specification (manual)

In order Hudson to know how to build the project you need (it's easiest) to manually checkout project workspace somewhere on the build server. Let's assume it's "/home/darek/src/cmake". I have some test project there connected to GIT version control system. I am able to issue git commands there and have access to GIT server to pull new commits.

You need to select "New Job" link and fill the following fields:

  • Task Name: I suggest to use name without spaces (to be able to use it in file names without problems), for example: "ProjectGamma"
  • "Build a free-style software job" - as it's C++ project let's design it from scratch

After creating the project you can fill the properties of new project, I'll list those you need probably to change:

  • "Advanced Job Options" / "Use custom workspace" = "/home/darek/src/cmake"; you tell Hudson to change to this directory before the build
  • "Discard Old Builds" / "Max # of builds to keep" = 100 (choose depending on your build output and available space on build machine)
  • "Add build step" / "Execute shell" / "Command" = "git pull && make clean && make"
  • "Post-build Actions" / "Archive the artifacts" fill the field with executable name, in my case it's "SampleCmake"
  • Save

Then it's time to click "Build now" link / icon. New build is started and finished. We can see the console output from the process and can download the build output (the "SampleCmake" binary).

To summarize: at this point we have the following functionality covered:

  • Launch a build manually based on fresh commits from GIT repository
  • Observe the build status
  • Download generated artefacts

Record the exact version (GIT commit)

It's very important to save the commit ID somewhere in order to know what state is represented by the build. In my project I used to collect that information in a file called "versions.txt" (it's a file because usually there are many repositories involved). I'm going to collect there GIT sha used for the build and short commit description (very useful if you want to quickly see the state).

In order to achieve that you add another build step and enter:

git log --decorate --pretty=oneline --abbrev-commit > versions.txt

And change your "Archive the artifacts" line to:

SampleCmake,versions.txt

After the build you can see versions.txt available in the build artefacts.

Trigger builds automatically

Next step is the automation. You need to trigger the build as soon as new version is available for pull from GIT.

First of all, you need the GIT plugin: "Manage Hudson" / "Manage Plugins" / "Available" / "Featured" / "Hudson GIT plugin".

Then (after Hudson restart) new options are available in build job configuration:
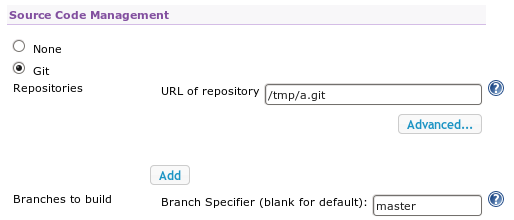
650(I've added local GIT repository placed under /tmp/a.git, for real deployments you need remote URL for git repository).

Additionally you need to tell the frequency of new version checks (Build Triggers / Poll it would be detected SCM): "* * * * *" means check every minute.

And, finally, you need to remove manual "git pull" step from the build configuration as the plugin takes care of that.

Then once you add new commit and new build would be started automatically.

Tags: jenkins.
Fri, 22 Jan 2016 20:24:00 +0000

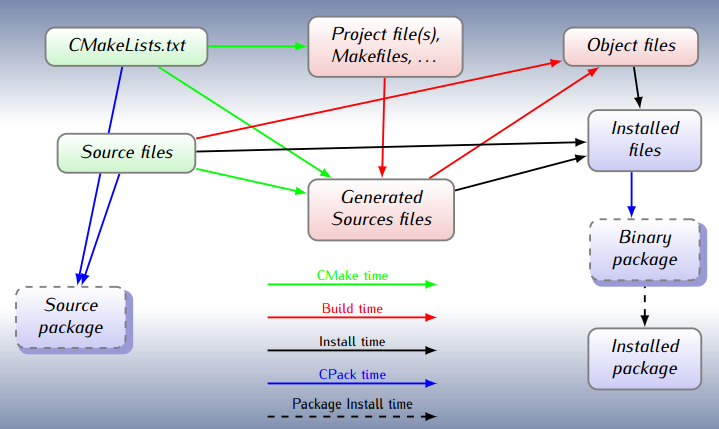
slider-cmakeWriting Makefiles is a complicated process. They are powerful tools and, as such, show quite high level of complexity. In order to make typical project development easier higher level tools have been raised. One of such tools is CMake. Think of CMake for Make as C/C++ compiler for assembly language.

CMake transforms project description saved in CMakeLists.txt file into classical Makefile that could be run by make tool. You write your project description in a high level notation, allowing CMake to take care of the details.

cmake_workflow

Let's setup sample single source code executable, the simplest possible way (I'll skip sample_cmake.cpp creation as it's just C++ source code with main()): $ cat CMakeLists.txt cmake_minimum_required(VERSION 2.8) project (SampleCmake) add_executable(SampleCmake sample_cmake.cpp) Then the build: $ cmake . -- The C compiler identification is GNU -- The CXX compiler identification is GNU -- Check for working C compiler: /usr/bin/gcc -- Check for working C compiler: /usr/bin/gcc -- works -- Detecting C compiler ABI info -- Detecting C compiler ABI info - done -- Check for working CXX compiler: /usr/bin/c++ -- Check for working CXX compiler: /usr/bin/c++ -- works -- Detecting CXX compiler ABI info -- Detecting CXX compiler ABI info - done -- Configuring done -- Generating done -- Build files have been written to: /home/darek/src/cmake

$ make Scanning dependencies of target SampleCmake [100%] Building CXX object CMakeFiles/SampleCmake.dir/sample_cmake.cpp.o Linking CXX executable SampleCmake [100%] Built target SampleCmake

After the procedure one can find the output in current directory: SampleCmake binary (compiled for your host architecture, cross-compiling is a separate story).

More complicated example involves splitting project into separate shared library files. Let's create one in a subdirectory myLibrary/, new CMakeLists.txt there: project (myLibrary) add_library(MyLibrary SHARED sample_library.cpp) Then you need to reference this library from Main CMakeLists.txt file: add_subdirectory(myLibrary) include_directories (myLibrary) target_link_libraries (SampleCmake MyLibrary) What happens there?

  • myLibrary subdirectory is added to the build
  • subdirectory for include files is specified
  • SampleCmake binary will use MyLibrary

Let's build the stuff now: $ cmake . -- Configuring done -- Generating done -- Build files have been written to: /home/darek/src/cmake $ make Scanning dependencies of target MyLibrary [ 50%] Building CXX object myLibrary/CMakeFiles/MyLibrary.dir/sample_library.cpp.o Linking CXX shared library libMyLibrary.so [ 50%] Built target MyLibrary Scanning dependencies of target SampleCmake [100%] Building CXX object CMakeFiles/SampleCmake.dir/sample_cmake.cpp.o Linking CXX executable SampleCmake [100%] Built target SampleCmake Then you will get: an executable in current directory (SampleCmake) and a library in subdirectory (myLibrary/libMyLibrary.so).

Of course, some "obvious" make targets (as make clean) would work as expected. Others (make install_ might be enabled in a CMake configuration.

Interesting function (also visible in QMake) is the ability to detect changes in CMake project files and autoatically rebuild Makefiles. After 1st CMake run you don't need to run it again, just use standard make interface.

Tags: build, linux.
Sun, 10 Jan 2016 00:34:02 +0000

Executable Specification 1Executable specification is a "holly graal" of modern software engineering. It's very hard to implement as it requires:

  • Formal specification of rules
  • Transformation of those rules into real-system predicates
  • Stimulating system under tests state changes in repeatable manner

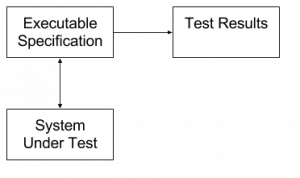
FitNesse is one of such approaches that specifies function sample inputs and outputs then allow to run such test cases using special connectors and provide colour reports from test runs. It's easy to use (from specification point of view), but has the following drawbacks:

  • Software architecture must be compatible with unit testing (what is very good in general: cut unnecessary dependencies, Inverse of Control, ...) - your current system might require heavy refactoring to reach such state
  • Rules are written and evaluated only during single test execution - different scenario requires another test case (no Design By Contract style continuous state validation)

Above features are present in any other unit test framework: JUnit, unittest, ... All such testing changes state and checks output.

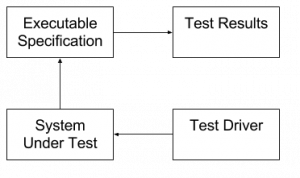
And now quite crazy idea has come to my mind: What if we forget about changing state and focus only on state validation? Executable Specification 2Then the executable specification won't be responsible for "test driver" job. Only state validation would be needed (including some temporal logic to express time constraints). That is much easier task to accomplish.

What about state changing then (the "Test Driver" role in the diagram) - you might ask? We have two options here:

  • random state changes to simulate global state machine coverage (randomtest.net)
  • click'n'play tools (which I hate, BTW) to deliver coverage over some defined paths (Selenium)
  • some API-level access to change system state and execute some interesting scenarios (system-dependant)

So let's go back to Specification then. Let's review some high level requirements (taken randomly from IPTV area) written in English and how they could be transformed into formal specification languages (I'm borrowing idea of "test tables" from FitNesse):

A requirement: video should be visible after device boot unless it's in "factory reset" state

Here we have the following state variables:

  • 1st_video_frame = true: detected by checking for special strings in decoder logs
  • device_boot = true: one could find unique entry in kernel log that shows device boot
  • factory_reset = true: missing some local databases state

Once parameters meaning has been specified by existence of log entries we could write the decision table here:

| device_boot | factory_reset | 1st_video_frame? | timeout | | true | false | true | 120s | | true | true | false | 120s |

As you might have noticed I've added extra parameter "timeout" that delivers the temporal part of the constraint. The meaning of this parameter is as follows: Given input condition is set the output condition should be met (even temporarily) in the timeout period

A requirement: the device should check for new software versions during boot or after TR-69 trigger, user might decide about the upgrade in both cases

Here we define the following state variables:

  • device_boot = true: the first kernel entry
  • check_software = true: proper log entry related to network activity for new software version retrieval
  • tr69_upgrade_trigger = true: local TR69 agent logs
  • user_upgrade_dialog = true: upgrade decision dialog visible

The decision table:

| device_boot | tr69_upgrade_trigger | check_software? | user_upgrade_dialog? | timeout | | true | - | true | - | 160s | | - | true | true | - | 30s |

(I use "-" as "doesn't matter" marker)

And here comes the hard part: we don't know whether new software is present for installation, so we cannot decide about user dialog. New property is needed:

  • new_sf_version_available

And the table looks like this:

| device_boot | tr69_upgrade_trigger | new_sf_version_available | check_software? | user_upgrade_dialog? | timeout | | true | - | true | true | true | 160s | | - | true | true | true | true | 30s | | true | - | true | false | false | 160s | | - | true | true | false | false | 30s |

We can see that table behaviour is a bit redundant there: we needed to multiply specification entries to show (tr69_upgrade_trigger x new_sf_version_available) cases.

However, above test will show failures when:

  • Despite the new version presence there was no software update dialog visible
  • No new version check has been triggered 160s after boot
  • ...

A requirement: rapid channel change should not exceed 600ms

This one looks a bit harder because of the low timeout and the usual buffering done on logs. However, having log flush interval limited to 100ms one can keep quite good performance and measure time with enough granularity.

Another caveat here is to exclude channels that are not available in current provisioning of the customer (you should see some up-sell page instead).

The states variable definition:

  • 1st_video_frame: specification as above
  • channel_up: P+ key has been pressed
  • channel_down: P- key has been pressed
  • channel_unavailable: system detects that current channel/event is not purchased yet

The specification:

| channel_up | channel_down | channel_unavailable | 1st_video_frame? | timeout | | true | - | false | true | 800ms | | - | true | false | true | 800ms |

Note that channel availability detection must be done at the same moment as channel change event - might be not true in most implementations (so not possible to reflect in our simple temporal logic language).

The implementation feasibility

In order above method to work it requires some kind of implementation.

  • System state changes detection: the output of a system could be serialized in single stream of textual events (redirected to serial line for embedded device, application server logs on server-based system)
  • Each interesting state variable changes could be derived from regexp parsing of above stream
  • On each state change all the collected rules would be examined to find active ones
  • The rules with timeout would setup a timeout callback to check the expected output state changes

The outputs of such test:

  • Failed scenarios with timestamp - for further investigation
  • Rules coverage - will tell you how good (or bad) your test driver is (how much coverage is delivered)

Based on first output you need to adjust your rules / matching patterns. Based on the second you should adjust your test driver policy.

It look like a feasible idea for implementation. I'm going to deliver a proof of concept in randomtest.net project.

Tags

Created by Chronicle v3.5